Thursday, October 30, 2008

Toffee Chocolate Bars

Our local Raleys Supermarket puts out a great recipe magazine, called Something Extra. I picked up the latest copy yesterday and found this Toffee Chocolate Bars recipe this morning. The recipe comes from a store called Ginger Elizabeth Chocolates. The store is located in Sacramento, California, which is about 90 minutes south of where I live.

Click on the candy store link - you will not be disappointed. There's a revolving montage of gorgeous chocolates, like chocolate porn.

Toffee Chocolate Bars

INGREDIENTS

1 cup butter, softened
1/2 cup sugar
1/2 cup packed brown sugar
1/2 tsp. vanilla extract
1 egg yolk
1¼ cups flour
1/2 tsp. salt
1 cup chocolate chips
1/4 cup chopped almonds, toasted

DIRECTIONS
Prep time: 15 minutes
Cook time: 10 to 12 minutes
Rest time: Several hours

Preheat oven to 350°F. Cream butter, sugar and brown sugar in the large bowl of an electric mixer. Add vanilla and egg yolk; mix in flour and salt. Spread mixture evenly onto a non-greased 16 X 12-inch baking pan and bake for 10 to 12 minutes, turning sheet from front to back after 6 minutes. Remove from oven; let rest for 2 minutes. Sprinkle chocolate chips over top and let stand for 5 more minutes. Spread smooth with a spatula and top with almonds. Let sit for several hours before cutting into 2-inch squares. (Refrigerate to firm, if needed.)

Makes about 48 pieces. Nutrition Per Serving: Nutrition per piece (17 g): 90 calories, 1 g protein, 6 g total fat (3.5 g sat., 0 g trans), 9 g carbohydrate, 0 g fiber, 6 g sugar, 35 mg cholesterol, 50 mg sodium, 2 points

Sunday, October 26, 2008

Teriyaki Sauce

Have you ever tasted Soy Vey Veri Veri Teriyaki Sauce?

Good stuff. I picked it up for the first time a couple of months ago, but it went fast. I decided to try to come up with my own version. I looked at online teriyaki recipes to try to get an idea, but other than a list of ingredients, I didn't find anything definitive. This is what I came up with on my own. You will definitely want to tweak it a bit, according to your taste. I wanted something with a good gingery-sesame flavor.

Teriyaki Sauce

1 cup soy sauce, I use Tamari soy sauce, I like the flavor better

1/2 cup sesame seeds

1/2 cup sugar, I used a non-bleached, organic sugar, but you could also use honey or brown sugar

1/4 cup sesame oil, you could use another oil, but this gives a good strong sesame flavor

2 TB water

2 tsp crushed ginger

1/2 tsp granulated oil

salt and pepper to taste

Put the sesame seeds in a dry pan over medium heat, flip the seeds around so that they brown, but do not burn.


Mix the rest of the ingredients in a two-cup measuring cup (helps with pouring when it's done). Use a fork to blend until smooth. When sesame seeds are browned, mix them in, as well. Taste and add salt and pepper as needed.

You can use the sauce for a marinade for meat, fish, or vegetables. Store in an air tight container, in the refridgerator.

Tonight, I'm using it for salmon, brocoli, and rice. I'm going to use it later in the week to make a dressing for a asian chicken salad.


Cream Of Brocoli Soup

I was hungry for something quick and warm for lunch. I took a peek in the fridge and found a huge bunch of brocoli that Leah and I picked up at the Farmer's Market, last Saturday. Cream of Brocoli Soup - quick and easy. We like a cheesy brocoli soup, but that adds a lot of fat and calories, so rather than making the whole pot that way, the kids and I grate cheese in the top and stir it through. Yum.

Cream Of Brocoli Soup

4-6 cups of clean, chopped brocoli
4 -5 cups of chicken broth
1 potato, clean, chopped into chunks
1/2 tsp granulated garlic
salt
pepper
1 1/2 cups nonfat milk
1 tsp flour
* Optional cheese - we used Cheddar and Asiago cheese, grated.

Heat chicken broth, add brocoli and potato chunks when broth reaches a boil. Add garlic. Turn down broth and cook vegetables until tender. When tender, take a potato masher and mash the vegetables. The potato helps to make a thicker soup.


Taste broth/brocoli mixture. Add salt and pepper to taste. Add flour to milk, stir until smooth, then add to soup. Heat until thickened a bit. Pour into individual bowls, then grate cheese over the top, stir through. That's it!


Sunday, October 19, 2008

LaRocca Winery

While visiting theFarmer's Market yesterday, my friend, Leah, and I met a local wine maker from the LaRocca Vineyard.
The LaRocca Winery produces organic wine up off of Hwy 32, in Forest Ranch, California. I got this from the company's website:

"Phillip LaRocca, owner and vintner, the character of the wine is absolutely dependent upon the quality of the grape. Growing grapes organically includes using farming methods that nurture the soil, air and water. Through the process of totally excluding the use of chemical fertilizers, herbicides and pesticides, all of LaRocca Vineyards receive organic certification by CCOF....The processing of LaRocca's wines, as certified by CCOF, excludes the use of these chemical additives including sulfites. Because the wines are chemical-free, from vine-to-bottle, adds to the drinking pleasure and supports the health of our environment."
The LaRocca Winery Tasting Room is open Saturday and Sunday, from 12-5. It's located in the town of Forest Ranch, 16 miles east of Chico, CA.
The wine is good and the fresh grapes aren't bad either.


Monday, October 6, 2008

Ruby Tuesday - Carnival Candy

Happy Ruby Tuesday! This was taken last Thursday at our school carnival. This booth was a candy booth - little sand candy. The kids loved it. It fits with the little bit of red theme. I hope that one is still okay. Here's a close-up of the candy. I didn't taste it, but it reminded me of the stuff in Pixie Sticks.
For more Ruby Tuesday, please visit Mary, the Teach at her blog Work of the Poet.

Shortcut Wheat Bread With Rosemary

Here is a recipe for wheat bread that is a bit of a cheat - the dough is made in the bread machine, but then you take it out, work it a bit, and bake it in the oven. I love my bread machine for pizza dough, but anytime I've ever tried to make bread in it, it has come out small, hard, and disappointing. This bread, it was an experiment and I'm pretty happy with how the experiment turned out. It makes some very tasty toast, too. I love toast.

Shortcut Wheat Bread With Rosemary

2 1/2 cups whole wheat flour

1 1/2 cups all purpose flour

1 1/3 cups warm water

1 package yeast

2 TB olive oil

2 tsp coarse salt

1 tsp fresh Rosemary, chopped

Preheat oven to 425 F

Add the ingredients into your machine in the order the manufacturer suggests. Mine goes like this - water, oil, salt, rosemary, flours, then make a little well in the top and add the yeast into the well. Set the machine to the "dough" setting, which runs for 9o minutes.

At the end of 90 minutes, pull the dough out and place it on a floured surface. Sprinkle additional flour on top and work it into the dough. You want a smooth, non-sticky dough.

Shape into a loaf and place on either an oiled cookie sheet or use some parchment paper (I prefer the parchment). Let rise until it's about doubled in size. Slash the top of the loaf 3 or 4 times, about a 1/2 inch deep.

Sprinkle the top of the loaf with water, then place in the oven. During the first 9 minutes, periodically open the oven door and mist or sprinkle more water on top of the bread dough.

At the end of 9 minutes, sprinkle with a light dusting of flour, reduce heat to 375F, and bake for an additional 10 minutes. At the end of the 10 minutes, tent with foil and then bake for 10 more minutes.

Bread is done when you can knock on it and hear a "hollow" sound. Place on a rack to cool. Cover, after cooling, to keep fresh.

Some notes.........

Sprinkling the dough with water, in the beginning, gives it a nice crust.

You may have noticed that in the picture my bread does not have the knife marks. Oops, please pretend that you did not notice that part. I forgot to do that step. ;D

Make sure that your bread is fully cooled before covering, you don't want a soggy bottom crust.

Saturday, October 4, 2008

Cranberry Orange Muffins

I felt like a little cooking today, so I made a couple of things - Cranberry Orange Muffins and a Quick Mac and Cheese dish.

I used dried cranberries for the muffins. Before I started getting anything together, I put a cup of water in the microwave for 2 minutes, then when it came out, I added 3/4 cup cranberries to plump them up. For the orange flavor, I used a couple of scoops of frozen orange juice concentrate. I wanted it very orangey.

Orange Cranberry Muffins

Makes 12 muffins

1 3/4 cup flour
1/3 sugar
2 tsp baking powder
1/4 tsp salt
1 beaten egg
3/4 cup milk
3/4 cup cranberries
1/4 cup canola oil
1/4 cup frozen orange concentrate
1 packet (about 1 tsp) of raw sugar (optional)

Preheat oven 400 degrees.

In a mixing bowl, combine flour, sugar, salt, baking powder. Mix egg, milk, oil, and orange concentrate, then add to dry mix bowl. Drain cranberries, then pour into bowl. Stir gently to combine. Lumps are fine, you don't want to over mix the batter.

Spoon into either greased muffin pan or paper muffin cup - 3/4 full. Then, sprinkle the raw sugar lightly over the top.


Place in oven and bake for 20 minutes or until golden brown. Let cool before eating.
I'll post the pasta recipe later. My Grandma just called. I hope that you enjoy your muffins.

Sunday, September 28, 2008

Blogtoberfest Call For Prizes


The company that I write the Dating Dames blog for, b5Media, is having a two-week event in October called Blogtoberfest. During the event, b5Media bloggers will be offering prizes to readers. It's an opportunity for people to get their wares and/or services a bit of publicity throughout the b5Media Lifestyles network. The network includes blogs on a large variety of subjects.

For more on Blogtoberfest, including contact info, please look at b5media Lifestyles Channel - Blogtoberfest Call For Prizes! That's a link to my Dating Dames blog where last week I talked about a free few days at Chemistry.com, cheating, science and how to use it to avoid infidelity, National Unmarried and Single Americans week, as well as how my boyfriend is The Man (the fisherMAN).

You know, I think I'm going to get something ready and offer it up as a prize. Why not? I've got to jump in at some point. Right? I've I want to be a photographer, at some point I've got to BE a photographer.

Friday, September 5, 2008

Corkscrew Pasta with Spinach and Tomatoes

This weekend I saw a recipe for Fusilli with Spinach and Asiago Cheese on the Food Network. The recipe was featured during Everyday Italian, and the idea was quick meals with items on hand. Sarah and I love Spinach, so we decided to try our own version of the dish last night. I only had about 4 cherry tomatoes, so I chopped some heirloom tomato left over from a salad that I made the day before. I skipped the Asiago, which I love, but did not have in my fridge, and I added onions. My fresh garlic was not as fresh as I thought it should be, so I used some granulated garlic instead. I skipped chopping the spinach. It smooshes down so much, this felt like a wasted step.

Here's what I had.......
Here's what I did...........

Corkscrew Pasta with Spinach and Tomatoes

1 lb of corkscrew pasta
1/4 cup olive oil
1 cup diced purple onions
1/2 tsp granulated garlic
6 cups fresh Spinach
2 cups tomatoes, chopped
salt
pepper
1/2 cup grated parmesan

As pasta cooks, start the sauce. Saute onions in olive oil until translucent. Add granulated garlic, then spinach. As spinach wilts, add in tomatoes. Taste a small amount, then add salt and pepper as needed. Pasta should be ready right around this point. Take out one cup of pasta water, set aside, then drain pasta. Dump pasta into sauce pan. Use tongs to turn the pasta over and over, to move the spinach and tomato throughout the pasta. Add 1/2 cup of the pasta water, continue turning over. This makes the vegetables saucier. Add the rest of the water, then sprinkle the cheese and work it through.

That's it. You are done.


Monday, August 25, 2008

Lemon Salad Dressing

This a simple recipe that can be adapted to many different purposes. When I made it, I used some as a marinade for chicken that I later grilled. I served the chicken over a salad of romaine, tomatoes, red onions, and mushrooms, that I dressed with the same the lemon dressing.

The dressing, when used for salad or as a marinade, can be adapted - you can add fresh herbs, more garlic, the addition of blood orange juice (I love blood oranges and it would give the dressing great color) or whatever sounds good to you. I used regular lemons, but I think it would be even better with Meyer Lemons. If you've never tried a Meyer Lemon, you are really missing out - they are incredible. When I made the chicken, I added some Garlic and Herb Mrs. Dash to the chicken, for added oomph. It made a very nice dinner, when accompanied by garlic toast.

Ingredients:
1/2 cup lemon juice
1 cup olive oil
1tsp sugar or honey (I used raw sugar, but usually I would use honey)
1/4 tsp granulated garlic
salt and pepper to taste

Put juice and everything except for the oil in a containe. Mix well, then add the oil. Mix again. An old salad dressing bottle works well for this.

Sunday, August 24, 2008

Toasty Cheese Sandwiches

I'm sorry about the big break between posts. I will try to be more consistent with my posts from now on.

This weekend, I wanted to make something good for lunch, for my children and myself. I had some chicken lunch meat, some left-over kaiser rolls from the previous nights turkey burgers, and some pre-shredded pizza cheese (a mixture of parmesan, provolone, and mozzarella). Typically I would use sliced cheese for sandwiches, but I didn't have that, so I decided to try a sort of melted cheese sandwich.

I took the rolls, cut them in half, buttered one side, then added a light layer of Dijon mustard. I sprinkled the pizza cheese over the half-buns, then set them on a cookie sheet, under the broiler.

In the meantime, I took the other kaiser halves and put a layer of mayonaise on them, then piled the chicken meat on top. When the cheese halves were nicely browned (mine were not as dark around the edges as they appear in the photo), I took them out of the oven and set them to the side for a moment.
Then, I put the two halves together and ta-da! Yummy sandwiches.

Wednesday, July 23, 2008

Wednesday

I haven't been cooking much this week - more warm-ups, than actual cooking-cooking. I've been busy with ........stuff. (I started running again and I'm exhausted).

I have, however, been watching some Food Network. Here are some observations:

*I don't get the appeal of Emeril, he is arrogant and his jokes are not funny. (I'm sure he's probably a nice man - I felt guilty when I re-read this entry).

*I do get the appeal of Bobby Flay. I wsh I could sit in that rooftop garden and sip something cool while I watch him grill. I'm a big fan of freckles.

*I love the cooking competitions. They are very inventive and exciting - anything could happen.

*I would like to see Adam win The Next Food Network Star. He's the most entertaining of the bunch.

*The various cooking show hosts overuse the word "literally." If you are teaching someone to cook, of course they are going to "literally" be doing the action. It's not going to get done if no literal action is taken.

Tomorrow I'm going to do some cooking-cooking, so I've got something to write about. See you then.

Monday, July 21, 2008

Ruby Tuesday - Strawberry

Here are two shots of a strawberry that I grew on my patio. My daughter's best pal, Karlee, is holding them for me.

Sorry I haven't been writing much lately. I will get back on track very soon.

Friday, July 18, 2008

Herbs - Greek Oregano


Greek Oregano
Origanum Vulgare

Greek Oregano is an herb that originated in the Mediterranean region. It was first used medicinally. The leaves can be brewed into a tea for an upset stomach or to aide in menstruation and the oil can be used to help with a toothache.

Oregano is a staple in Italian cooking, present in many tomato-based sauces. It enriches the flavor in egg dishes, breads, vegetables, meats, poultry, and seafood dishes.

I grow Greek Oregano in a pot on my patio. It can be started from seed, although I skipped that step and used a small start from the home and garden store. It requires sun, but will grow in partial sun. I have it on my patio, where it's partially shielded by larger plants and gets the heat of the afternoon sun.

It can be easily dried by hanging in a cool, dry place.

Wednesday, July 16, 2008

Mexican Basics - Spice Blend and Easy Chicken

When my teenagers were little, I used to read a food column in our local paper, The Chico-Enterprise Record. The column was written by a lady from Canada who wrote about a lifestyle that was pretty different from my California upbringing. She used French words and spoke about French cooking.

There are two items that I remember most from her column - a basic Mexican spice blend and a dish called Chicken In A Nutshell. I'll get to the Chicken In A Nutshell at a later date, haven't made it in years and it sounds really good, but today I will share with you my version of a Basic Mexican Seasoning Blend. I lost the clipping that held the blend recipe years ago, so it's become a basic dump-it-in recipe. Feel free to adjust it according to your own specific tastes. I've seen variations that use coriander, cayenne, and/or garlic. I don't add black pepper to the mix - I usually add that as I'm cooking.


I buy packets of Mojave spices at the supermarket, which makes this easy and inexpensive. I use this blend in all my Mexican cooking. I even use it as a dry rub on steak before grilling. You can add it to chicken broth for an enchilada sauce. The chili and cumin packets are about 1 oz a piece. I like a blend of a red chili and a browner chili.

1 packet California chili
1 packet New Mexico chili
1 packet Cumin
1 1/2 Tbs ground Mexican Oregano powder
1 1/2 Tbs cocoa powder, I use Hersheys
2 tsp salt
2 Tbs Masa Harina, or flour, but the masa works best

Put all ingredients in a glass jar. Shake to mix.
*****

Today I'm going to use the blend to make a basic Mexican style chicken in the crockpot. I use this chicken in enchiladas, tacos, burritos, taco salad, whatever. Today I'm going to use it in a taquito recipe for myself and my daughter, Bay. I like to use boneless chicken breasts or tenders, but you can use any cut of chicken in this recipe. De-boning is very easy after cooking in a crockpot all day.

Mexican Crockpot Chicken

Ingredients:
1 lb chicken breasts, no skin, no bones
1 small can salsa or about 3/4 cup of salsa
3/4 cup water
1 TB Mexican spice blend
Crockpot


Place the chicken in the crockpot, sprinkle spice blend on top, pour salsa over that, then add a cup of water. (Note * My water looks red here because I used it to get all the salsa out of the jar).
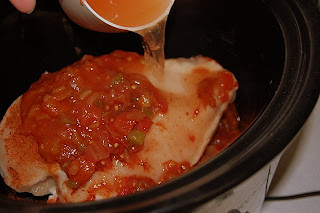
Put the lid on the crockpot, set it to High, and let it cook for about 4 hours. If you need more time, say a full work day, set it to Low and cook for an additional length of time - check your crockpot guide for the specific time advised for your machine.

When you are done, lift it out, shred it, and you will have something that looks like this.

Taquitos

1 lb cooked, shredded chicken, drained (too much moisture is dangerous when frying)

12 corn tortillas

canola for pan

toothpicks

Preheat oven to 350 F. Pour about 1/4 of canola oil in the pan, heat to medium high.

While pan is heating, steam tortillas. I use a plastic steamer that I place the tortillas in, microwave 1 minute, flip the stack over, microwave for 1 more minute, then cover with a lid. If you don't have a steamer (and I highly recommend one), you can steam the tortillas either in a warm over wrapped in foil, or in the microwave, kept them warm wrapped in a towel. If you do much Mexican cooking, think about purchasing the steamer. They are inexpensive and really handy.

Take about 2Tbs of chicken, place it along one end of the tortilla, roll tightly into a cylinder, fasten with a toothpick lengthwise, then set to the side. Do this with all 12 tortillas. Place the rolled tortillas into the pan 4 at a time, very lightly browning on all sides. Place browned tortillas on a cookie sheet, while you do the next two batches of 4 taquitos. When all are browned, place cookie sheet in oven for 10 minutes to further brown. ( I do it this way to ensure crunch and cut the time the taquitos are sitting in the oil).

Serve with sour cream, guacamole, and salsa.

Monday, July 14, 2008

Ruby Tuesday - Candy Thermometer

Happy Ruby Tuesday!


This is my candy thermometer. Prior to purchasing this, I used the ball method. You know, where you drop the hot candy mixture into water and decide if it's "soft ball" or "hard ball?" Using the thermometer, it's infinitely easier.
For more Ruby Tuesday pictures, you can find a list of participants here http://workofthepoet.blogspot.com/2008/07/ruby-tuesday.html

Creme Fraiche - What is it?

I watch a lot of the Food Network and something I hear mentioned frequently is creme fraiche. What is creme fraiche? The term, "creme fraiche," is actually supposed to have an accent mark, but I don't know how to add that in properly - sorry. The chefs on the Food Network, use it in different ways, so that didn't give me any serious hints. Is it like sour cream? Like cheese? It looks thickish, like a soft cheese. I decided to do some investigating and this is what I found......

Creme Fraiche is a milk product, made from the cream. Naturally occurring bacteria, when left on it's own, works with heat to change the cream into a thick, rich cream. In the USA, creme fraiche is pasteurized. It has a nutty flavor and doesn't separate when heated. It can be used in sauces or baking - use it in place of traditional sour cream for a richer, creamier result.

Okay, so now I know - it's like a fancy pants sour cream. If you are interested in using creme fraiche in a Salmon Fettucine recipe, there's one that sounds delicious here http://butterandcheese.net/Recipes/Main%20Course/Salmon%20and%20Dill%20Fettuccine.php And if you'd like to make some creme fraiche of your own, you can find that here http://www.joyofbaking.com/CremeFraiche.html

Sunday, July 13, 2008

Simple Pot of Pasta

Last night, I had a hunger for garlic and I wanted to make something quick and easy for dinner. I put a pot of water on to boil, then I gathered lemon juice, crushed garlic, sea salt, pepper, and olive oil to marinate a couple of pieces of salmon. Today I'm going to focus on the pasta, so I'll skip explaining the salmon grilling instructions. If you are looking for salmon grilling ideas, I would look here http://search.foodnetwork.com/food/recipe/grilled+salmon/search.do?searchString=grilled+salmon&site=food&searchType=Recipe

I like a simple creamy sauce, that "cooks" when you mix it with hot, drained pasta. You can use any kind of pasta. I like fettucine best, but last night I used penne. It's a very simple, adaptable recipe.

Start with 1 cup of cottage cheese, 1 egg, 1/2 cup parmesan, finely chopped garlic, a dash of nutmeg, and salt and pepper. Mix it all together in a bowl while your pasta cooks. When your pasta is al dente, reserve about 1 cup of cooking liquid, then drain it in a strainer. Return the pasta to the pan, then pour the sauce mixture over the pasta, stirring to coat. Add approximately 1/2 cup of the cooking water to the mixture - the starch in the water helps with the sauce texture. The egg helps the cheeses to coat the pasta. Top the pasta with extra parmesan and freshly ground pepper.


For variation, you can switch up your cheese - I like to add a pizza blend sometimes - or you can use sour cream instead of the cottage cheese. I also like to finally chop onion and add it to the sauce, along with fresh herbs like basil. Chopped nuts like walnuts or pine nuts would be great sprinkled over the top.
My daughters and I placed the salmon on top of the pasta and added a simple salad. Yum.

Saturday, July 12, 2008

Saturday Morning - French Toast

I'm going to try to follow a sort of loose schedule with this blog. On Saturday mornings, I enjoy making something fun for my kids and occasionally my boyfriend, when he is in town. Actually, when he's here for a visit, I try to get him to cook for me. He's awesome in the kitchen.

This morning I decided to make French Toast. Years ago, when I was pregnant with my oldest child, Max, who is now almost 18, I had the opportunity to enjoy some really good brunch buffets. I lived, at the time, with my now ex-husband, Todd, in Spokane, Washington. We didn't go out to dinner much - we were breakfast/brunch folks.

One morning we had this incredible French Toast. It was on smallish, thickish, pieces of French bread and it was coated with a layer of browned powdered sugar. I assume that they cooked the toast in some sort of deep-fryer, but I don't own a deep fryer. I've never been able to replicate it exactly at home, but I try and I have accomplished a pretty good version of it. Here's how I make it...........

French Toast

Ingredients:
8 slices of French bread, use thickness of your choice, I used sandwich style today
3 eggs
1 cup milk (I like nonfat)
1 tsp vanilla
powdered sugar
canola oil

Preheat oven to 350F degrees. Take a cookie sheet, line with parchment paper (or spray with oil spray) and set aside. Pour canola oil into a pan, heat to medium. Sprinkle powdered sugar on a plate.

It's best to use day-old bread, but if all you have is fresh, lay it out to dry for a bit. This will make a firmer bread, which is easier to handle. Break the eggs into a bowl, add milk, and vanilla. Beat the mixture, lay a slice of bread on top of it, flip the bread over quickly, then place into the hot pan.
Brown briefly, then flip with a spatula. I don't brown the toast deeply, because I'm going to pop it in the oven soon and crisp it up there.
Pull the toast out, place over powdered sugar, flip and sugar other side. If it's not sticking, sort of pat the sugar into the toast. Place on the waiting cookie sheet, then start all over again with a new piece of toast. When you have all 8 pieces on the sheet, take a little screened strainer, and sift additional sugar over the top. Place the sheet into the oven and bake for 12 minutes. For an even crisper crust, turn on the broiler and broil for an additional minute or 2. Watch closely.

At this point, the toasts are ready to be served as is, or you can add butter and syrup, if you prefer.

Introduction

Hello. My name is Michelle. I love to cook and to read about food and to watch cooking shows. I would like to talk about many food-related topics on this blog. If you have something in particular that you would like me to cover, please email me and I will do my best to include taht topic.

This is my second blogspot blog - my first being my main blog, http://askewtoyou.blogspot.com . It's going to be a cooking blog, hence the name, "A Cook's Bounty." I originally started a blog with the same name over at wordpress.com, but I find blogspot easier to use, so I'm going to move what I had over here, eventually.

Thanks for your time and attention.